Homeowner: How to Make Perfect Board and Batten Siding For Your Century Home
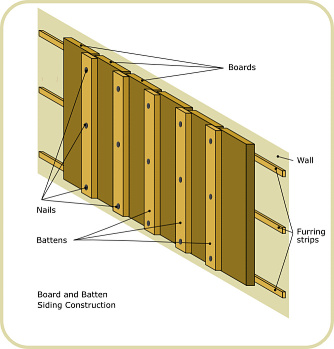
Figure 1: Board and Batten Siding.

If you have an older home, you need to remember to use the old and timeless building methods, both to keep the historical character of the building and because the building was designed to work in a particular way.
We are going to have our house repainted, but before we do that we need to repair the siding a little. These are some notes I made about how to do that, because it turns out that most local builders put the siding on incorrectly, in a way that makes it not last very long.
Disclaimer: I am not a builder, and I don't claim that these notes are "correct"---I give them here in case they help other people.
Our house has wooden board and batten siding. If you have this on your house you should inspect it at least once a year to look for damage and repair it. Before painting, though, and in any case every few years, it's a good idea to do a more thorough inspection and to replace any split or rotting battens. Before painting you should also seal any boards that are leaking pitch, e.g. with "Binz" sealant.
The siding we have is made of vertical boards that are some ten inches wide (they vary) and maybe a little over inch thick. Do not try to save money by using thinner wood: you need this wood to last, and you also want the protection and insulation! The boards are nailed into place and then held firmly down with thin vertical strips of wood called battens. The illustration in Figure 1 shows all the parts.
How to build the Siding
Let's go through this one step at a time. These steps are really rough notes; do some research and ask someone local before relying on them! We are not builders.
1
First, I'll assume you've prepared your wall, which, in North America, is probably chipboard or plywood, although in an older house (at least in Ontario) it might be brick.
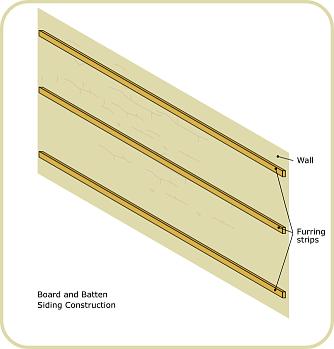
Figure 2: Furring Strips

Next, fasten horizontal strips of seasoned wood to the wall. You can use nails or screws, but these strips will be taking most of the weight of the siding, so use good wood and fasten them on well. You might want to prime them, or to paint them with preservative, before fastening them in place. Cedar is a good wood to use, but if it's too expensive you can use something cheaper. Wood prices seem to vary too much by region to say more on this.
These strips are sometimes called furring strips rather than studs, because they are horizontal. Fasten them two feet apart from each other, or slightly closer.
Figure Two shows the furring strips.
An optional (but obviously sensible) next step is to put insulation between the furring strips, and then to put a barrier, such as Tyvek or vapour barrier over both the furring strips and the insulation. I have not shown this step here, because it makes the diagrams too hard to follow. This is most likely to be needed (I imagine) if your house doesn't already have insulation in the inner wall.
2
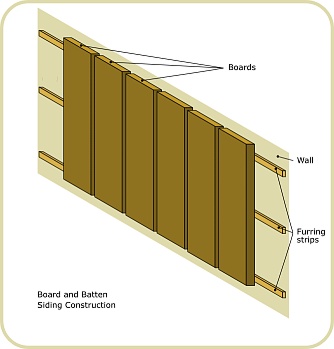
Figure 3: Boards nailed to the furring strips

After the furring strips are in place, along with any insulation, you can do the boards. You might also want to think about any electrical work you need to have done, because once the boards are in place you won't be able to run cables around very easily. For outside lights, though, it's probably best to have the wires come through the gaps between the boards, as you'll see later..
The boards are solid wood, and you should paint them on all sides (including the ends) with preservative if you're going to be using stain, or with primer if you're going to paint the house. Once the boards are completely dry you can nail them to the furring strips, as shown in Figure Three.
You need to leave a gap of half an inch between the boards. Don't panic, the gaps will be covered up by the battens!
If you are replacing old boards, though, remember that the boards might not all have been the same width! Note also that timber is getting narrower, so if you order ten inch wide boards, where they were at one time ten inches, then nine and three quarters, today they are probably only nine inches wide, or nine and a quarter, and cost more too! You also need to ``acclimate'' your wood, as described later.
The gaps between the boards allow the house to flex a little (which it will!) and also allow the wood to warp and shrink or swell with the changing seasons (which it will!).
See below for more on which nails to use and where to put them.
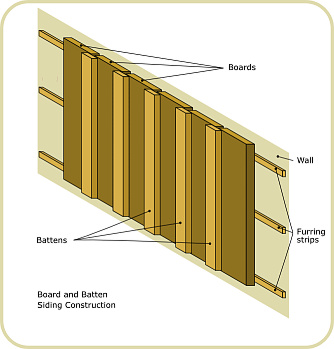
Figure 4: Battens over the gaps between boards

3
After the boards are in place you can fasten battens over the gaps. The battens must be made of seasoned wood, and it's recommended that you leave the wood outside with a tarpaulin loosely weighted down over it, or in a covered area nearby, to help the wood to get acclimatised before you fasten it on. You should do the same with boards, by the way, but with the boards you need to raise each board up from the one beneath it, when you stack them, so the air can get all round them, for at least a week before painting or staining them.
If you are going to paint, put primer on the battens before nailing them into place. Don't forget the ends! You should get the primer (or stain) tinted to match the paint colour you have chosen.
You should use siding nails to put the battens in place, and you will need three-and-a-half-inch ones if you can get them. The nails have to go an inch and a quarter to an inch and a half into the furring strips (or into whatever they go into), which means you will need longer nails for the battens, to allow for the thickness of the boards. Avoid electroplated nails; galvanized ones are fine. Otherwise they will rust over time, and the rust stains will be very visible on your house. The proper siding nails have little rings into them all the way down, and ringed solid stainless steel nails are also good, but if you can't get those, twisty galvanized nails will probably suffice.
Figure Four shows where the battens go, but the position of the nails is also important.
Figure 5: The nails go in the middle

4
The battens are not nailed to the boards. Instead, the nails go through the gaps between the boards and into the furring strips. This lets the boards flex, and it also reduces the chance that the nails will split the wood either of the boards or of the battens.
On our house most of the battens were nailed at the edges, so a lot of them have split. In addition, in parts of the house, there are no visible furring strips, so our only real choices were to take everything off and start again, to nail the battens into the chipboard wall, or to nail the battens by the edge, and we've had to do a mixture.
If your battens are three inches wide they are probably wide enough to cover up the nails you used for the boards, if you like; if not, though, the nails will make a horizontal line that will look just fine, and in any case if you are painting it won't be very noticeable. You are supposed to put the nails in the centre of the boards, though, to reduce the chance of the wood splitting. If your boards are more than six inches wide (as they should be) you should use two vertical rows of nails three inches apart, equally spaced out from the middle of the board.
Handy Tip: Bang nails all the way through the battens before you put them up. The ends of the nails should stick out by about quarter of an inch. When you go to line up the batten, the protruding ends of the nails will go into the slot between the boards and help you get the batten in the right place.
5
After you have put the battens in place you may want to caulk along the edges if there are any cracks, because otherwise the rain will get in, and also the wind will suck out all your heat in the winter. You need to use a caulk that you can paint over and that will stretch. Suitable caulking can be found at Home Hardware (at least in Ontario).
Handy tip:The fastest way to put caulking in place is to make a long strip of it along the crack using the caulking gun, then take a damp cloth or a latex glove and smooth it down into place.
Once you have a nice watertight finish it's time to paint!
[these pages are in preparation and not yet public]
Next: painting